
If you’re a Valence developer with a fair amount of 5250 subfile programming under your belt, you certainly don’t miss the days of creatively abbreviating columns and “folding” rows in an effort to squeeze everything your users need into a 24×80 text screen. By contrast, creating a Valence grid app through Nitro App Builder is so simple and naturally accommodating for large numbers of columns that it can be tempting to include everything under the sun in your grids so users never go wanting for additional data.
But keeping the “Less is More” principle in mind, sometimes too much of a good thing can make for a rather clunky user experience. Grids with huge numbers of columns and horizontal scrolling can convey a sense of on-screen congestion, particularly for users with lower-resolution displays. Though you can of course configure your grids so users can resize, hide or resequence columns, you should strive to limit the number of columns in grid apps to just the elements they need to see, perhaps supplemented with drill-down functions where appropriate.
In cases where a user may only sometimes need to see additional info on a row, another powerful UI option you can employ is a tool tip. Using this approach, a quick mouse hover over any cell can show pertinent data to the user that would otherwise take up a separate column.
The grid widget’s cell renderer function allows you to use simple JavaScript code to grab data from any other column in the data source, including columns that aren’t displayed in the grid, and add code to adjust the column output as desired. Using this technique we make any cell show supplemental information in the form of a tool tip as the user hovers their mouse over it.
To see this concept in action, let’s start by creating a very simple data source over the example customer master file included with Valence called DEMOCMAST. The data source should pull in all the columns.
Next we’ll create a grid widget over the data source. For sake of example, let’s only include a few of the columns from the data source – the customer number, name and city. The configuration page should thus look something like this:
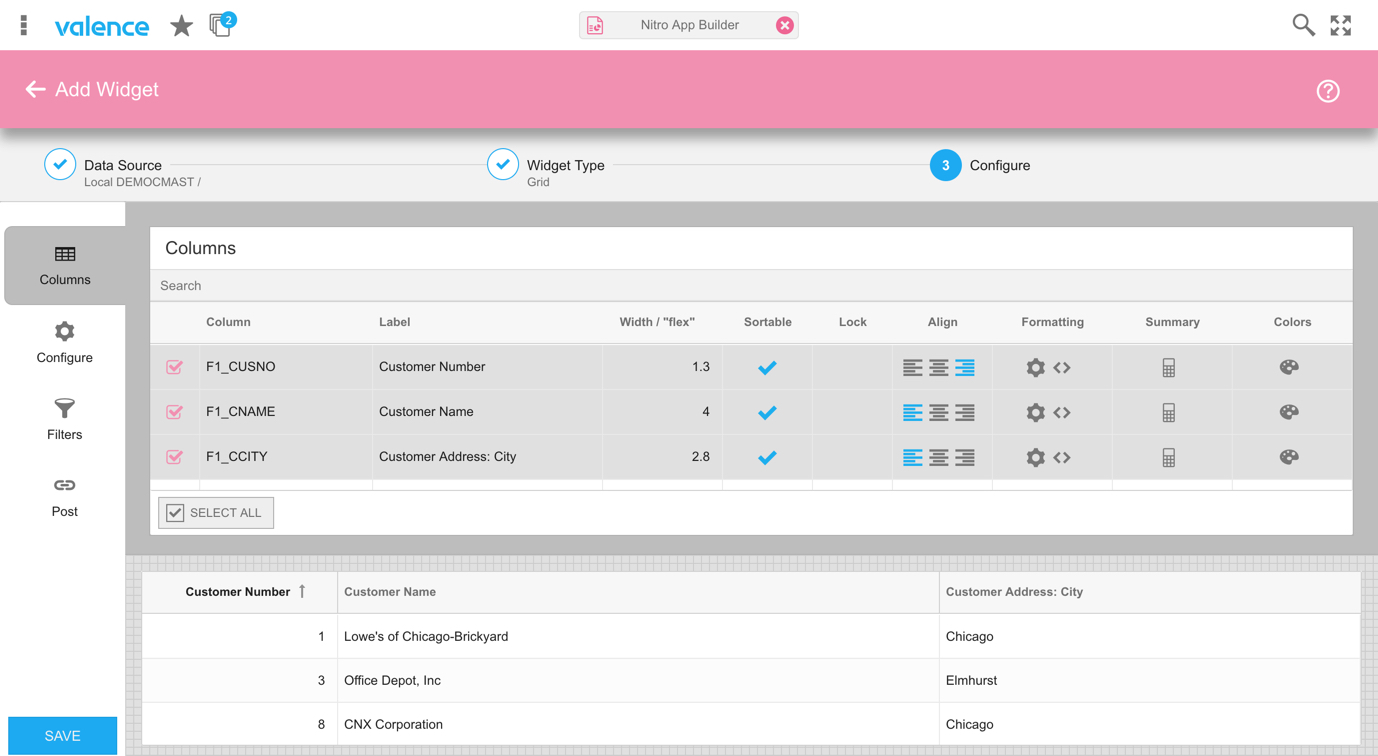
Now we’ll deviate from the usual process, creating a renderer that applies a tool tip to the City column. This will allow users to see the full customer address whenever they hover their mouse over the City cell. To open the renderer config, click the <> code symbol to the right of the cogwheel on the City row…

This will bring up the renderer function for that cell:
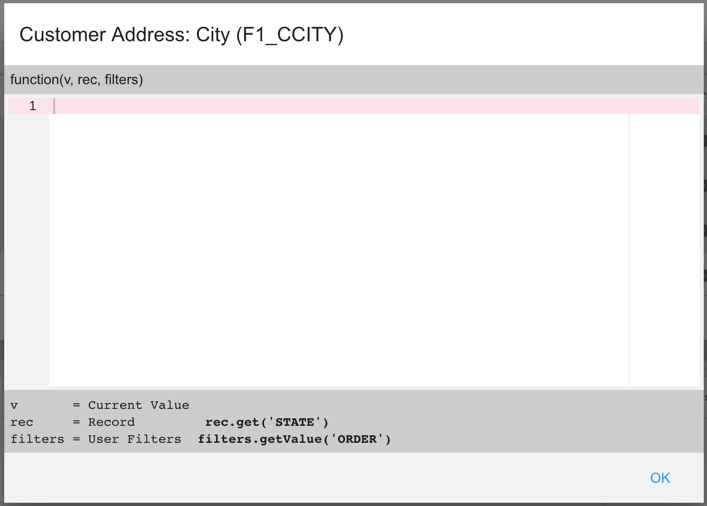
Notice at the top of the window it’s showing you the parameters being passed into the function:
- v – the value of the cell (what is currently being displayed and what will be displayed)
- rec – a reference to the store row (allows you to pull in other column values)
- filters – a reference to any user filters being applied
For our purposes here we want to override the “v” value to include appropriate markup for a tooltip, while continuing to show the original value in the cell. For an Ext JS grid we can do this by wrapping the “v” inside a <div> section that sets the data-qtip property, as follows:
‘<div data-qtip=”‘ + your_tool_tip_text_goes_here + ‘”>’ + v + ‘</div>’
This is a good opportunity to demonstrate how you can inject some simple JavaScript and HTML code to construct a multi-line tool tip. All we need to do is pull in all the address values and then programmatically create the text that will constitute the tool tip.
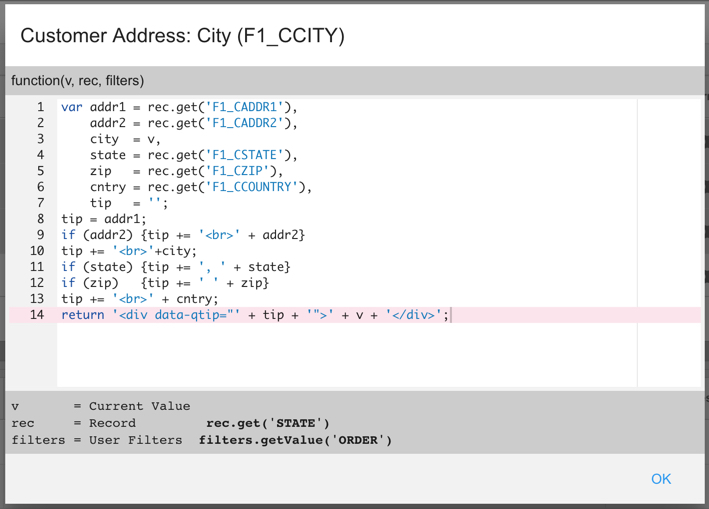
In this renderer, lines 1 through 7 are declaring work fields for the process and setting their values. Lines 1, 2, 4, 5 and 6 use the rec.get() method to pull in values from the row, based on the field names in the data source. Line 3 could have been specified as rec.get(‘F1_CCITY’), but since this is the renderer for the City column we know that the city value is already being passed into the function as “v”. Line 7 is a work field for our tool tip.
Line 8 initializes the tool tip to the first address line, on the presumption that it will never be blank.
Line 9 injects an HTML line feed (<br>) into the string and appends the optional second address line if it’s not blank (a blank value is treated as false in JavaScript when specified in this context).
Line 10 injects a line feed followed by the city.
Lines 11 through 13 add a comma, the state and zip when specified, followed by the country on its own line.
Finally, line 14 injects the tip into the return value. This is what gets sent back to the cell.
Once you’ve created the renderer, you can see it in action by hovering your mouse over the cell…

Apply this technique regularly to add some interactive behavior to your grid apps while keeping the list congestion/clutter to a minimum. Your users will greatly appreciate it!