
Just about every business has a situation where users need to perform a single process against multiple items in one pass. For example, you might have a list of open invoices that you’d like to flag as ready for payment, or a group of inventory items that you would like to transfer out of a special holding area. Rather than making your users do individual transactions for each invoice that needs to be paid, or each product that needs to be moved, you could significantly speed up the operation by providing your users a list of selectable records and an action button.
With this kind of setup, your users would simply check off all the records they would like to process, then click a single button labeled “PAY” or “MOVE” to trigger a mass adjustment. An RPG program you create then receives an array of records to process and handles all the appropriate business logic. Valence’s Nitro Query App Builder tool makes it possible to quickly create such an app, typically with a minimal amount of back-end RPG code required. This is particularly true in cases where the RPG program processing the front-end call can simply call one of your existing RPG programs in multiple passes, passing in the key value (such as the invoice number or product code) as a parameter on each call. This post will walk you through the process of creating such an app in three basic steps.
Note: To follow the instructions in this tip you should be on Valence release 5.1.20180118.0 or later, as there are is a new “Post” configuration tab on the grid and edit grid widgets that is put to use here.
Step 1: Create the front-end grid widget
The first step is to create a Nitro Query grid or edit grid widget through which your users will interact with your data. You will of course first need to create a data source to feed the grid, then create the basic grid widget. Note that you won’t be adding any checkbox column or action button here — that’ll be handled in Step 2. One key element in the grid widget that you’ll want to take advantage of here is the new “Post” tab. This tab identifies which field(s) should be sent to your RPG program when the user clicks on the action button. In most cases, you’ll probably only need to pass one key field (such as the invoice number or product code referenced above).
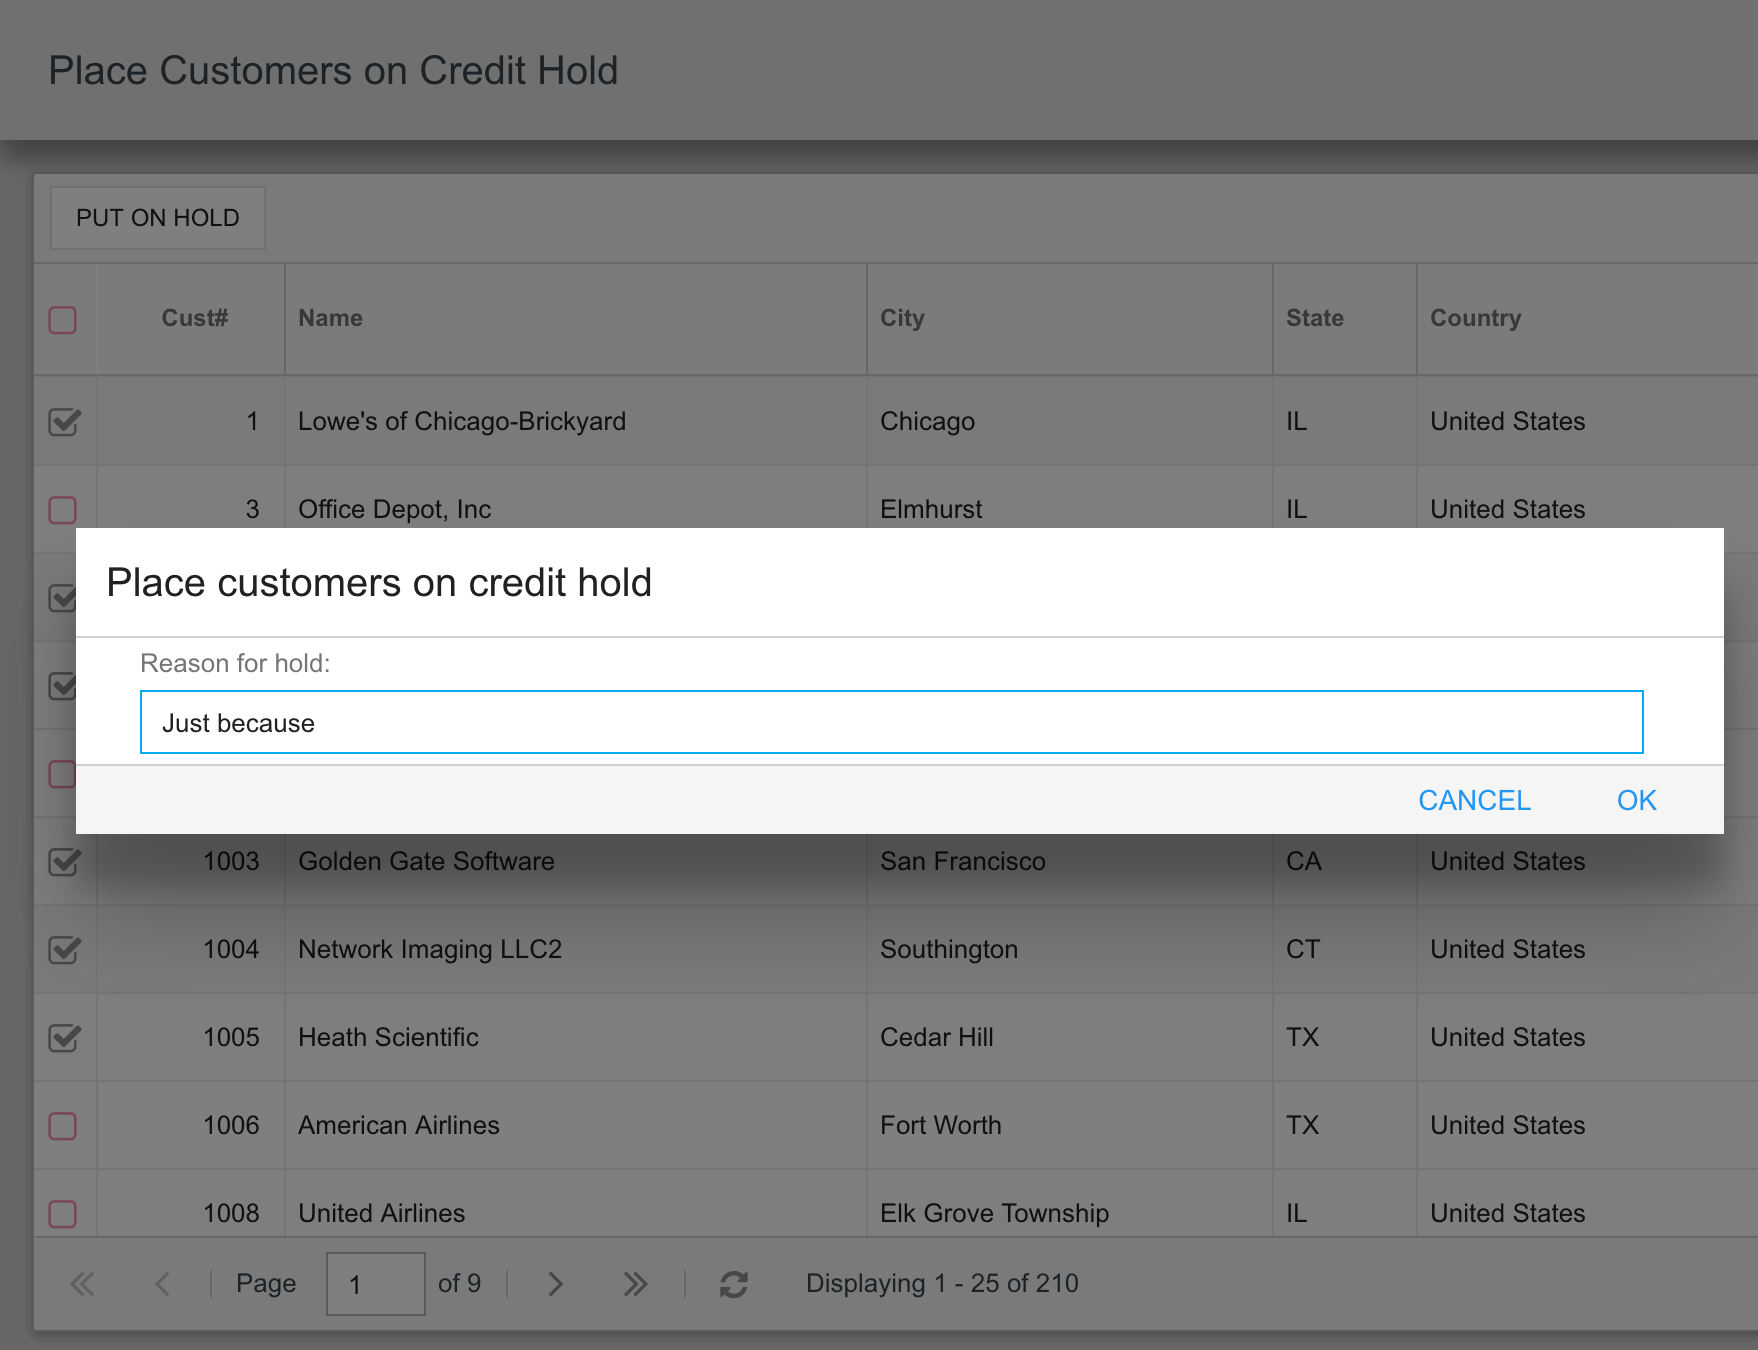
For demonstration purposes, let’s say we want to create an app through which users can place multiple customers, selected from a list, on a “credit hold” status. So first we’ll create a data source over the sample DEMOCMAST file, then create an edit grid over that containing a few pertinent columns. Our RPG program that handles the credit hold process only requires one thing — the customer number. So on the Post tab we’ll just check the CUSNO column as the value we want passed to the server when a “Put on Credit Hold” button is pressed.
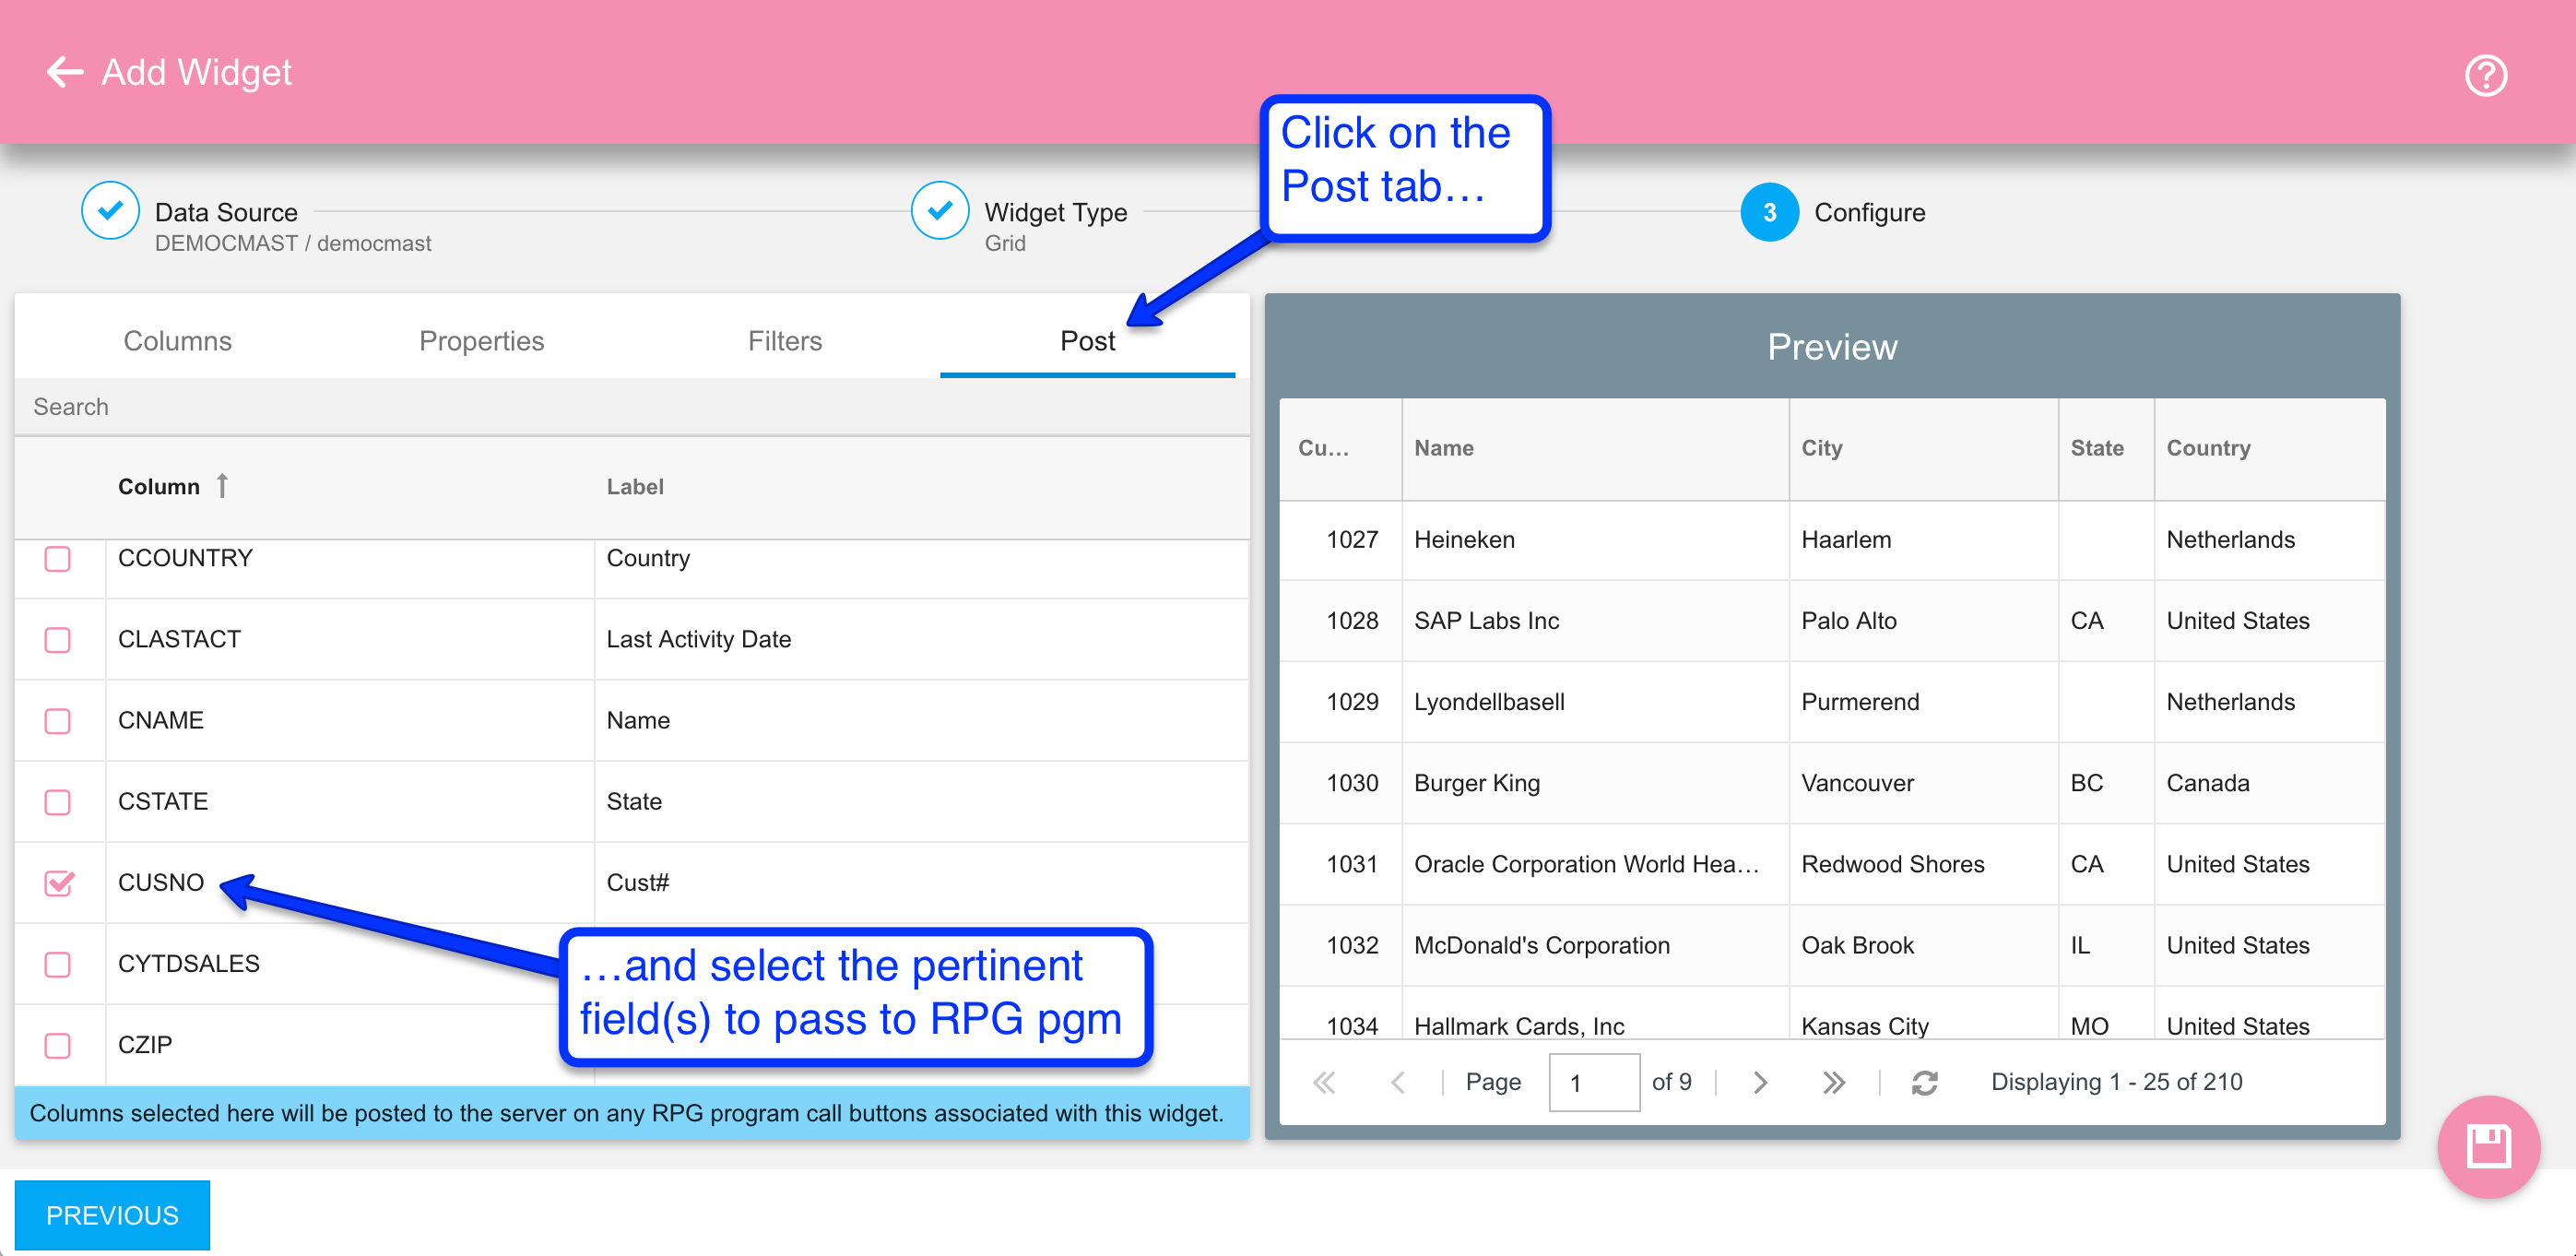
Note that if we didn’t select any columns on the Post tab then every cell from every selected row would be passed to the back-end. For grids containing many columns that could make for a lot of extra data for the back-end to parse through, so it’s best to select only the fields your RPG program needs to process the action so the size of the data posted is minimal.
Step 2: Add a selection column and action button
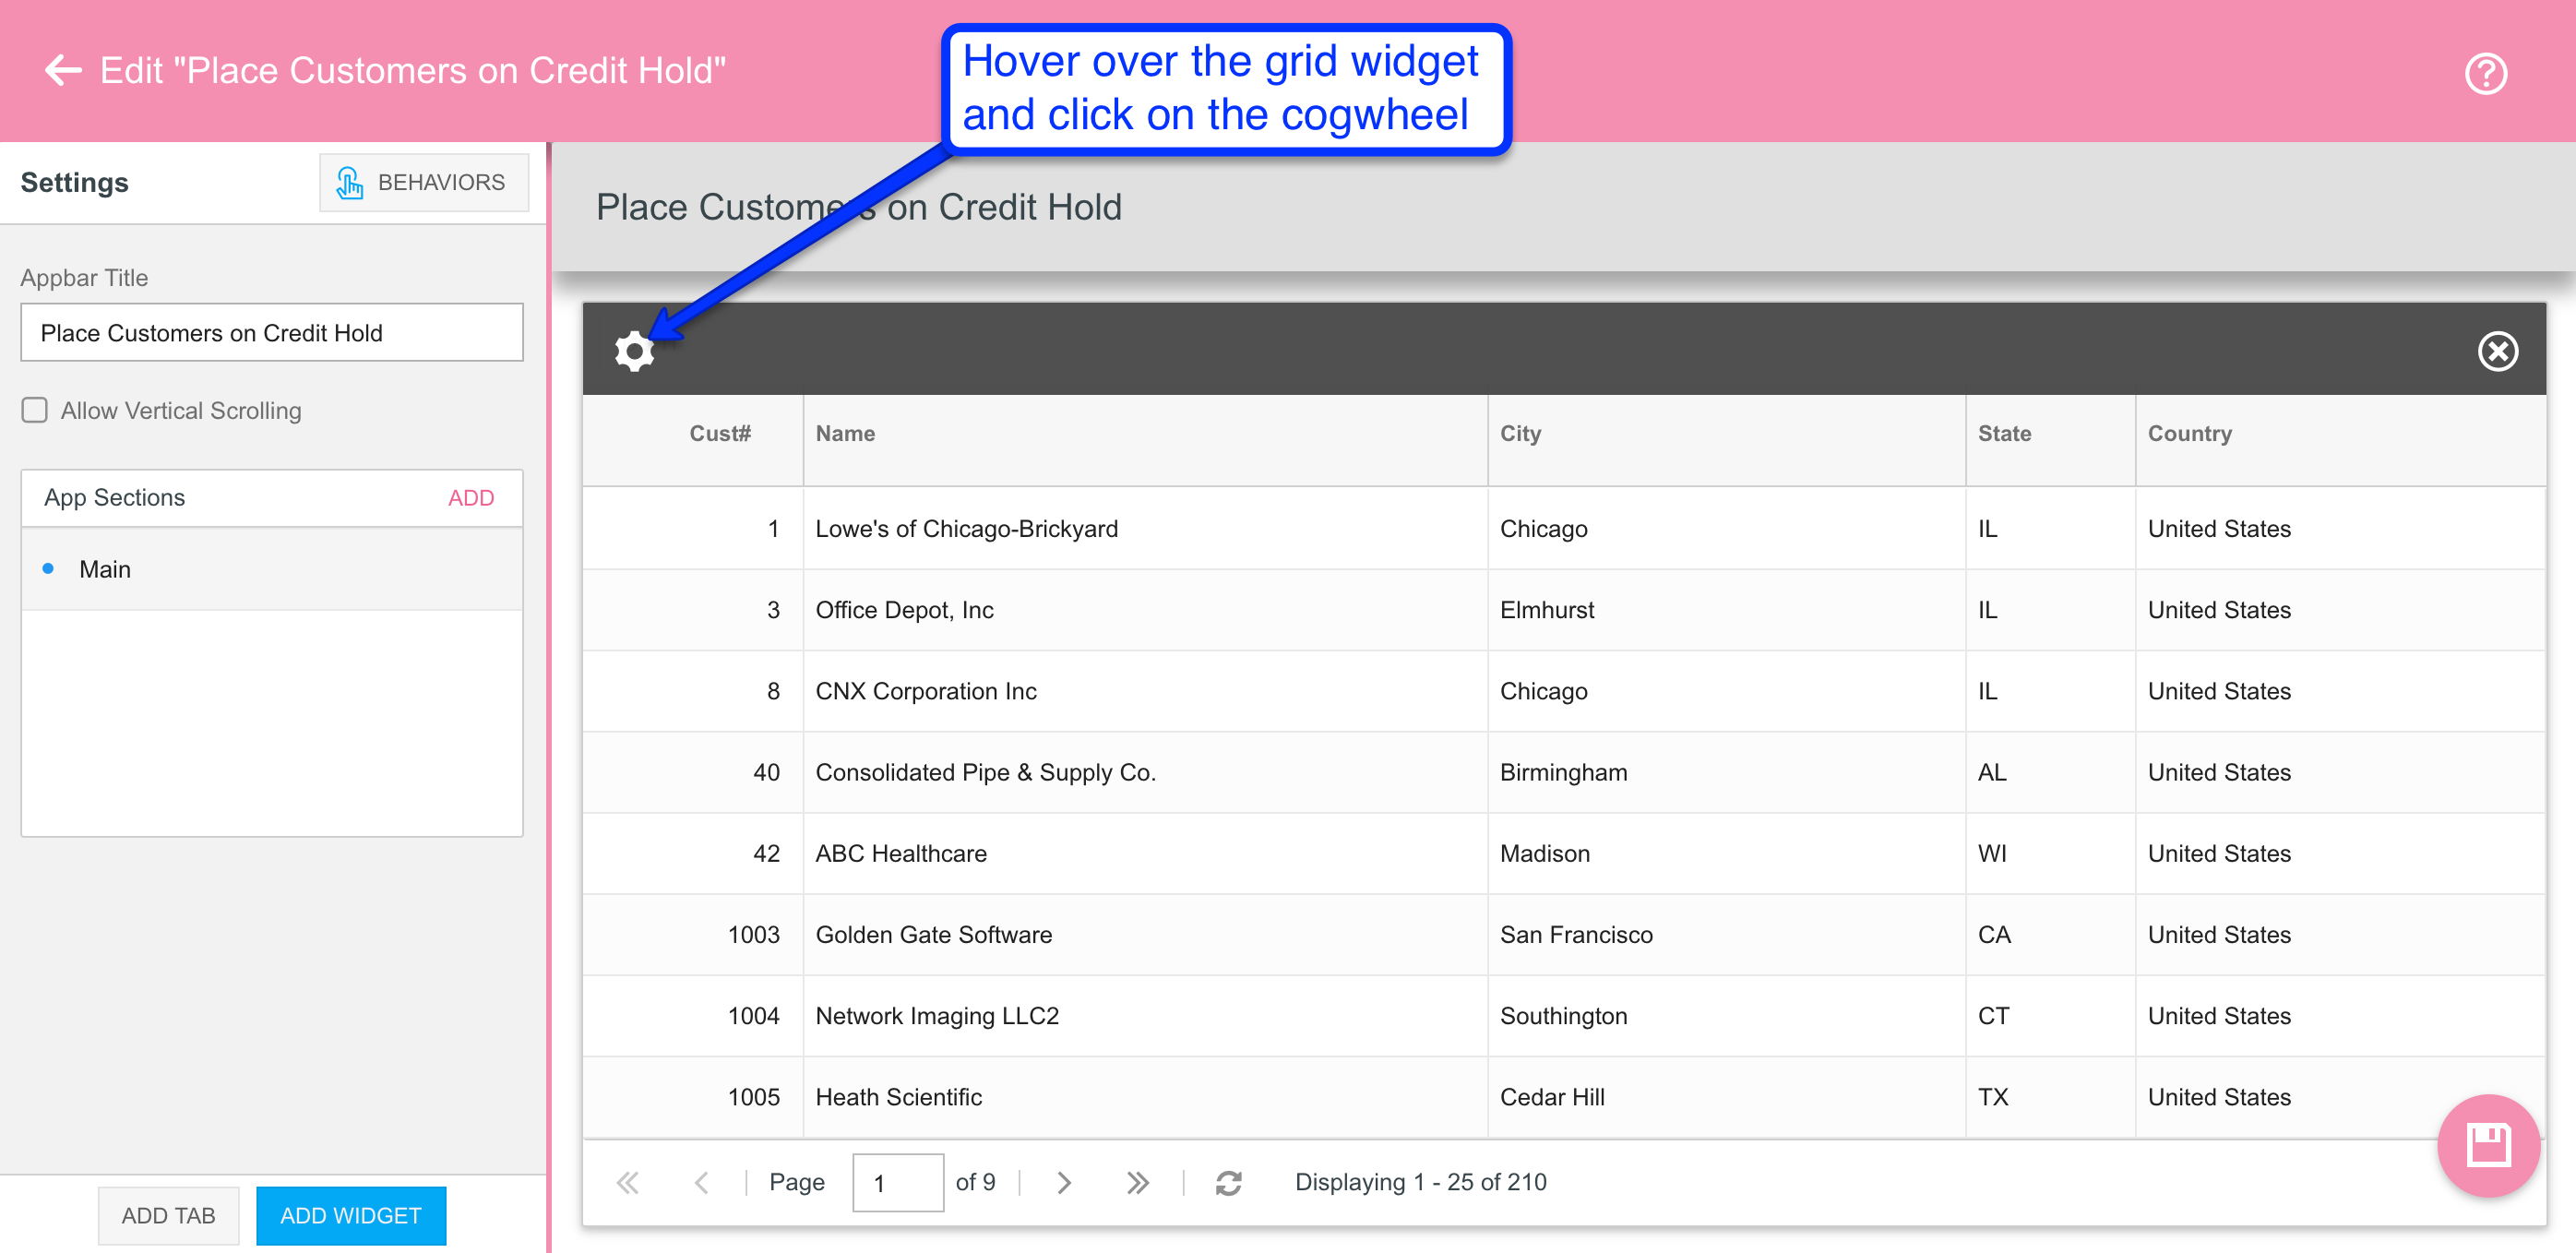
With the data source and widget created, the next step is to create a Nitro Query App with special settings that allow users to select one or more rows and then click a button to act on them. Using the DEMOCMAST grid example from step 1, we’ll first configure it to enable checkbox-style row selections. Access the widget settings by hovering over the grid widget and clicking on the cogwheel icon:
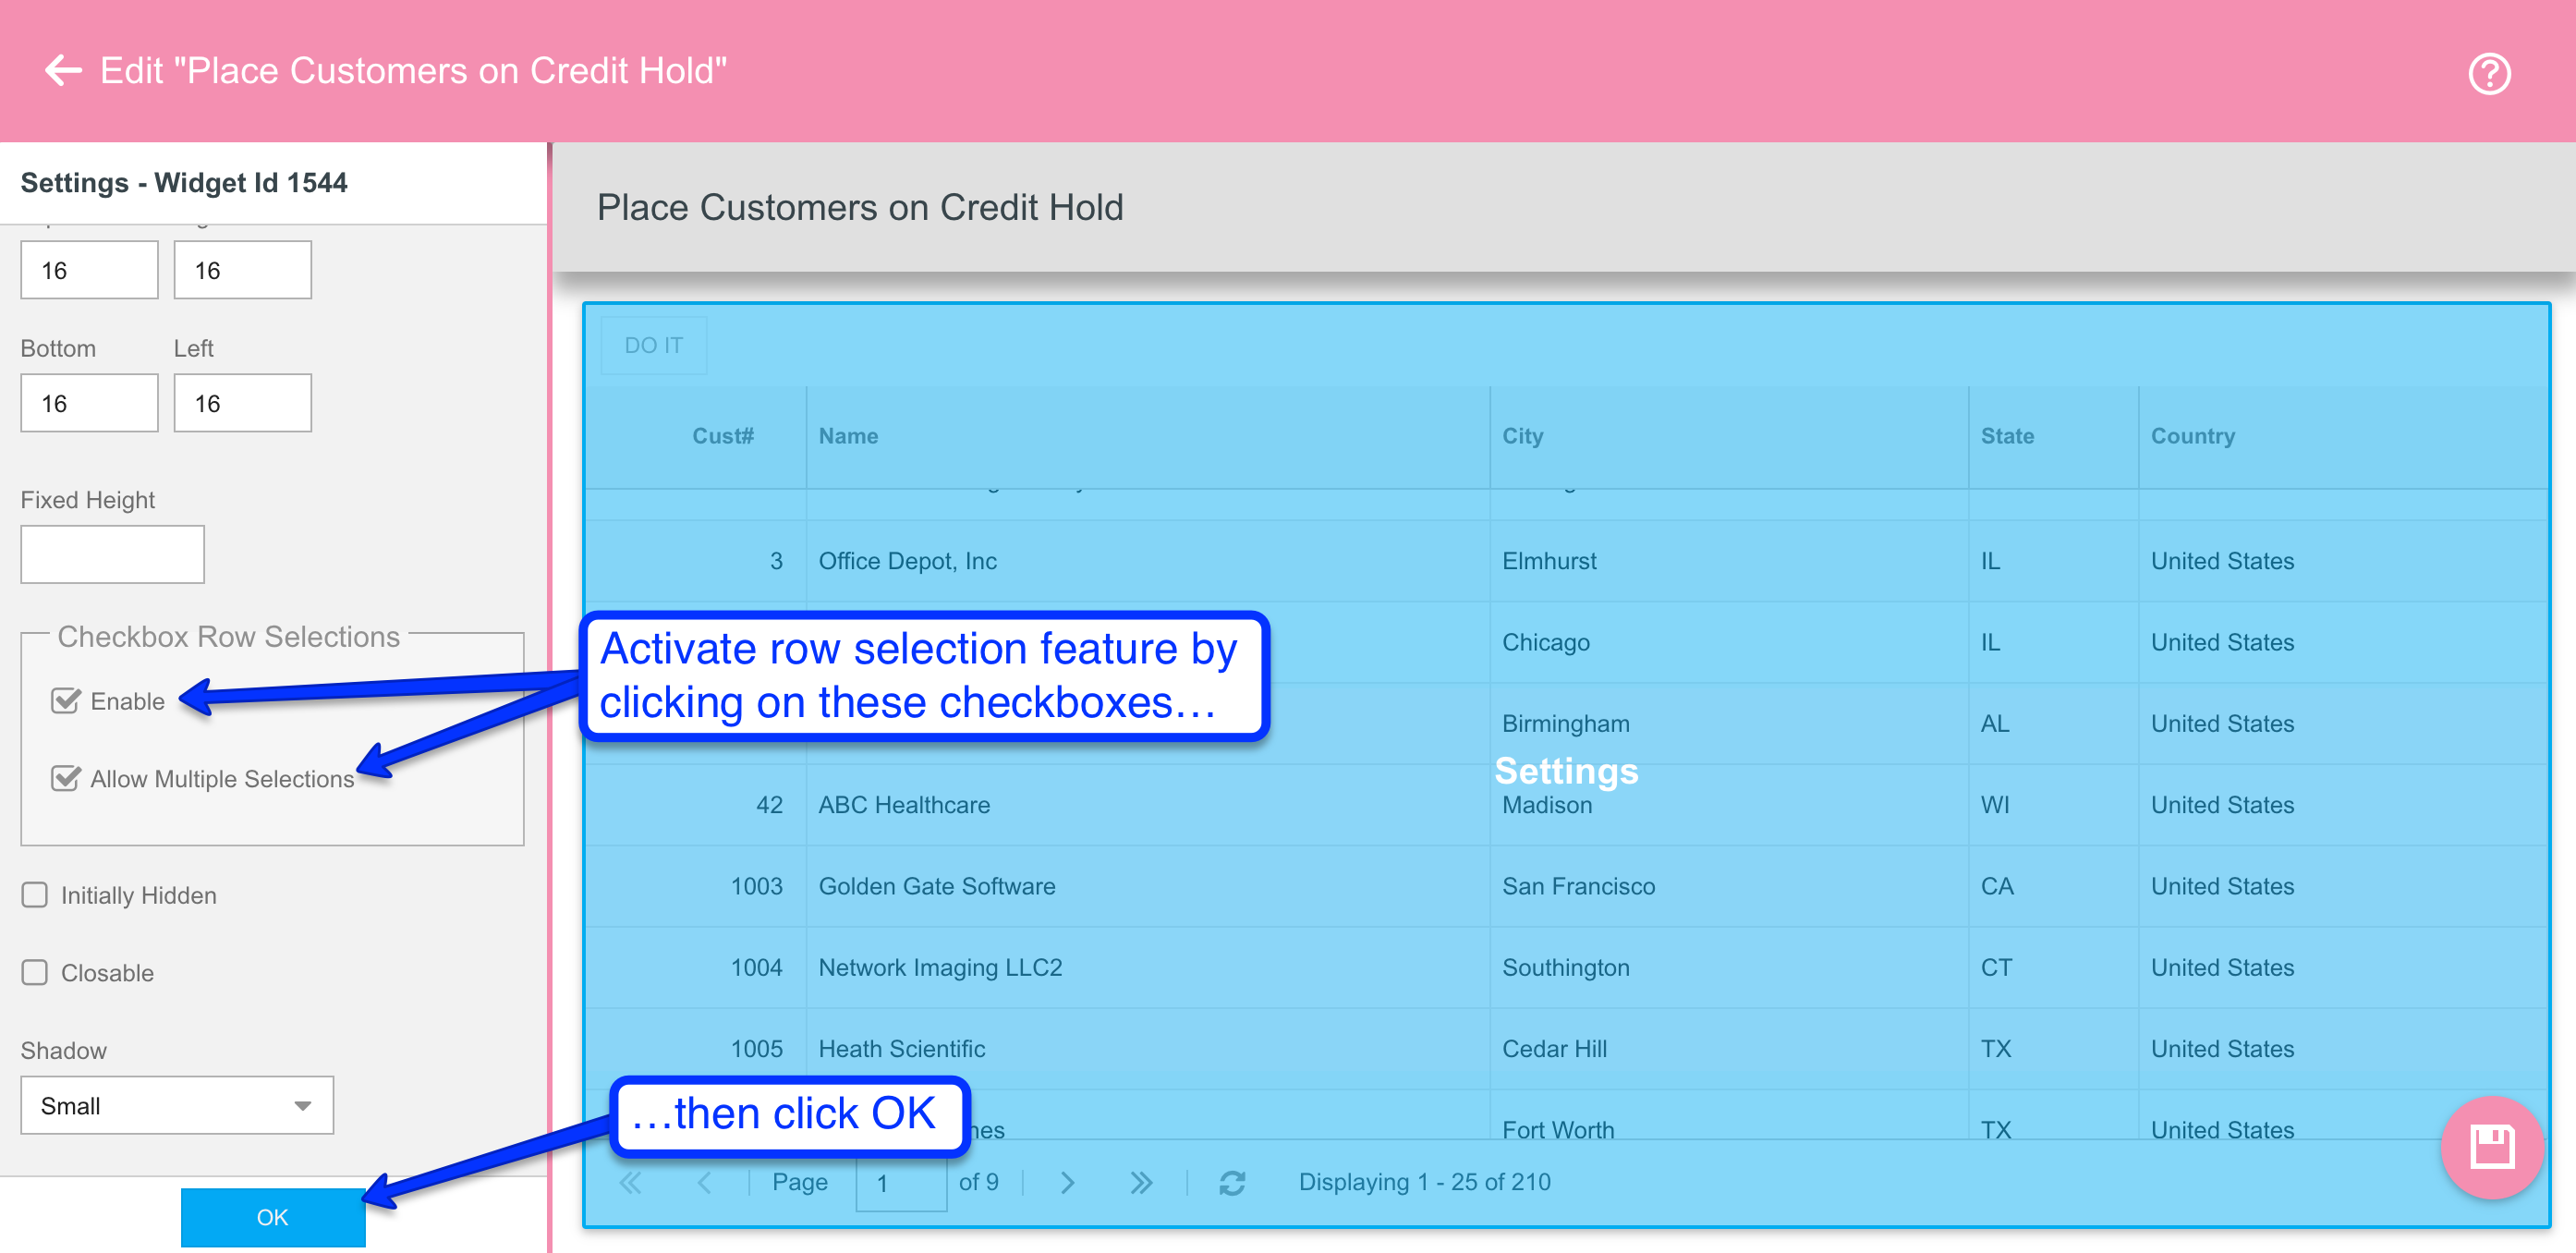
Once in the widget settings, you can activate the row selection functionality by checking on the “Enable” checkbox in the “Checkbox Row Selections” field set. If you want users to be able to select more than one row, be sure you also check the “Allow Multiple Selections” checkbox. Then hit the OK button. Note that adjusting these settings will not cause the selection column to show in the preview panel, but the functionality will be there once you launch the app.
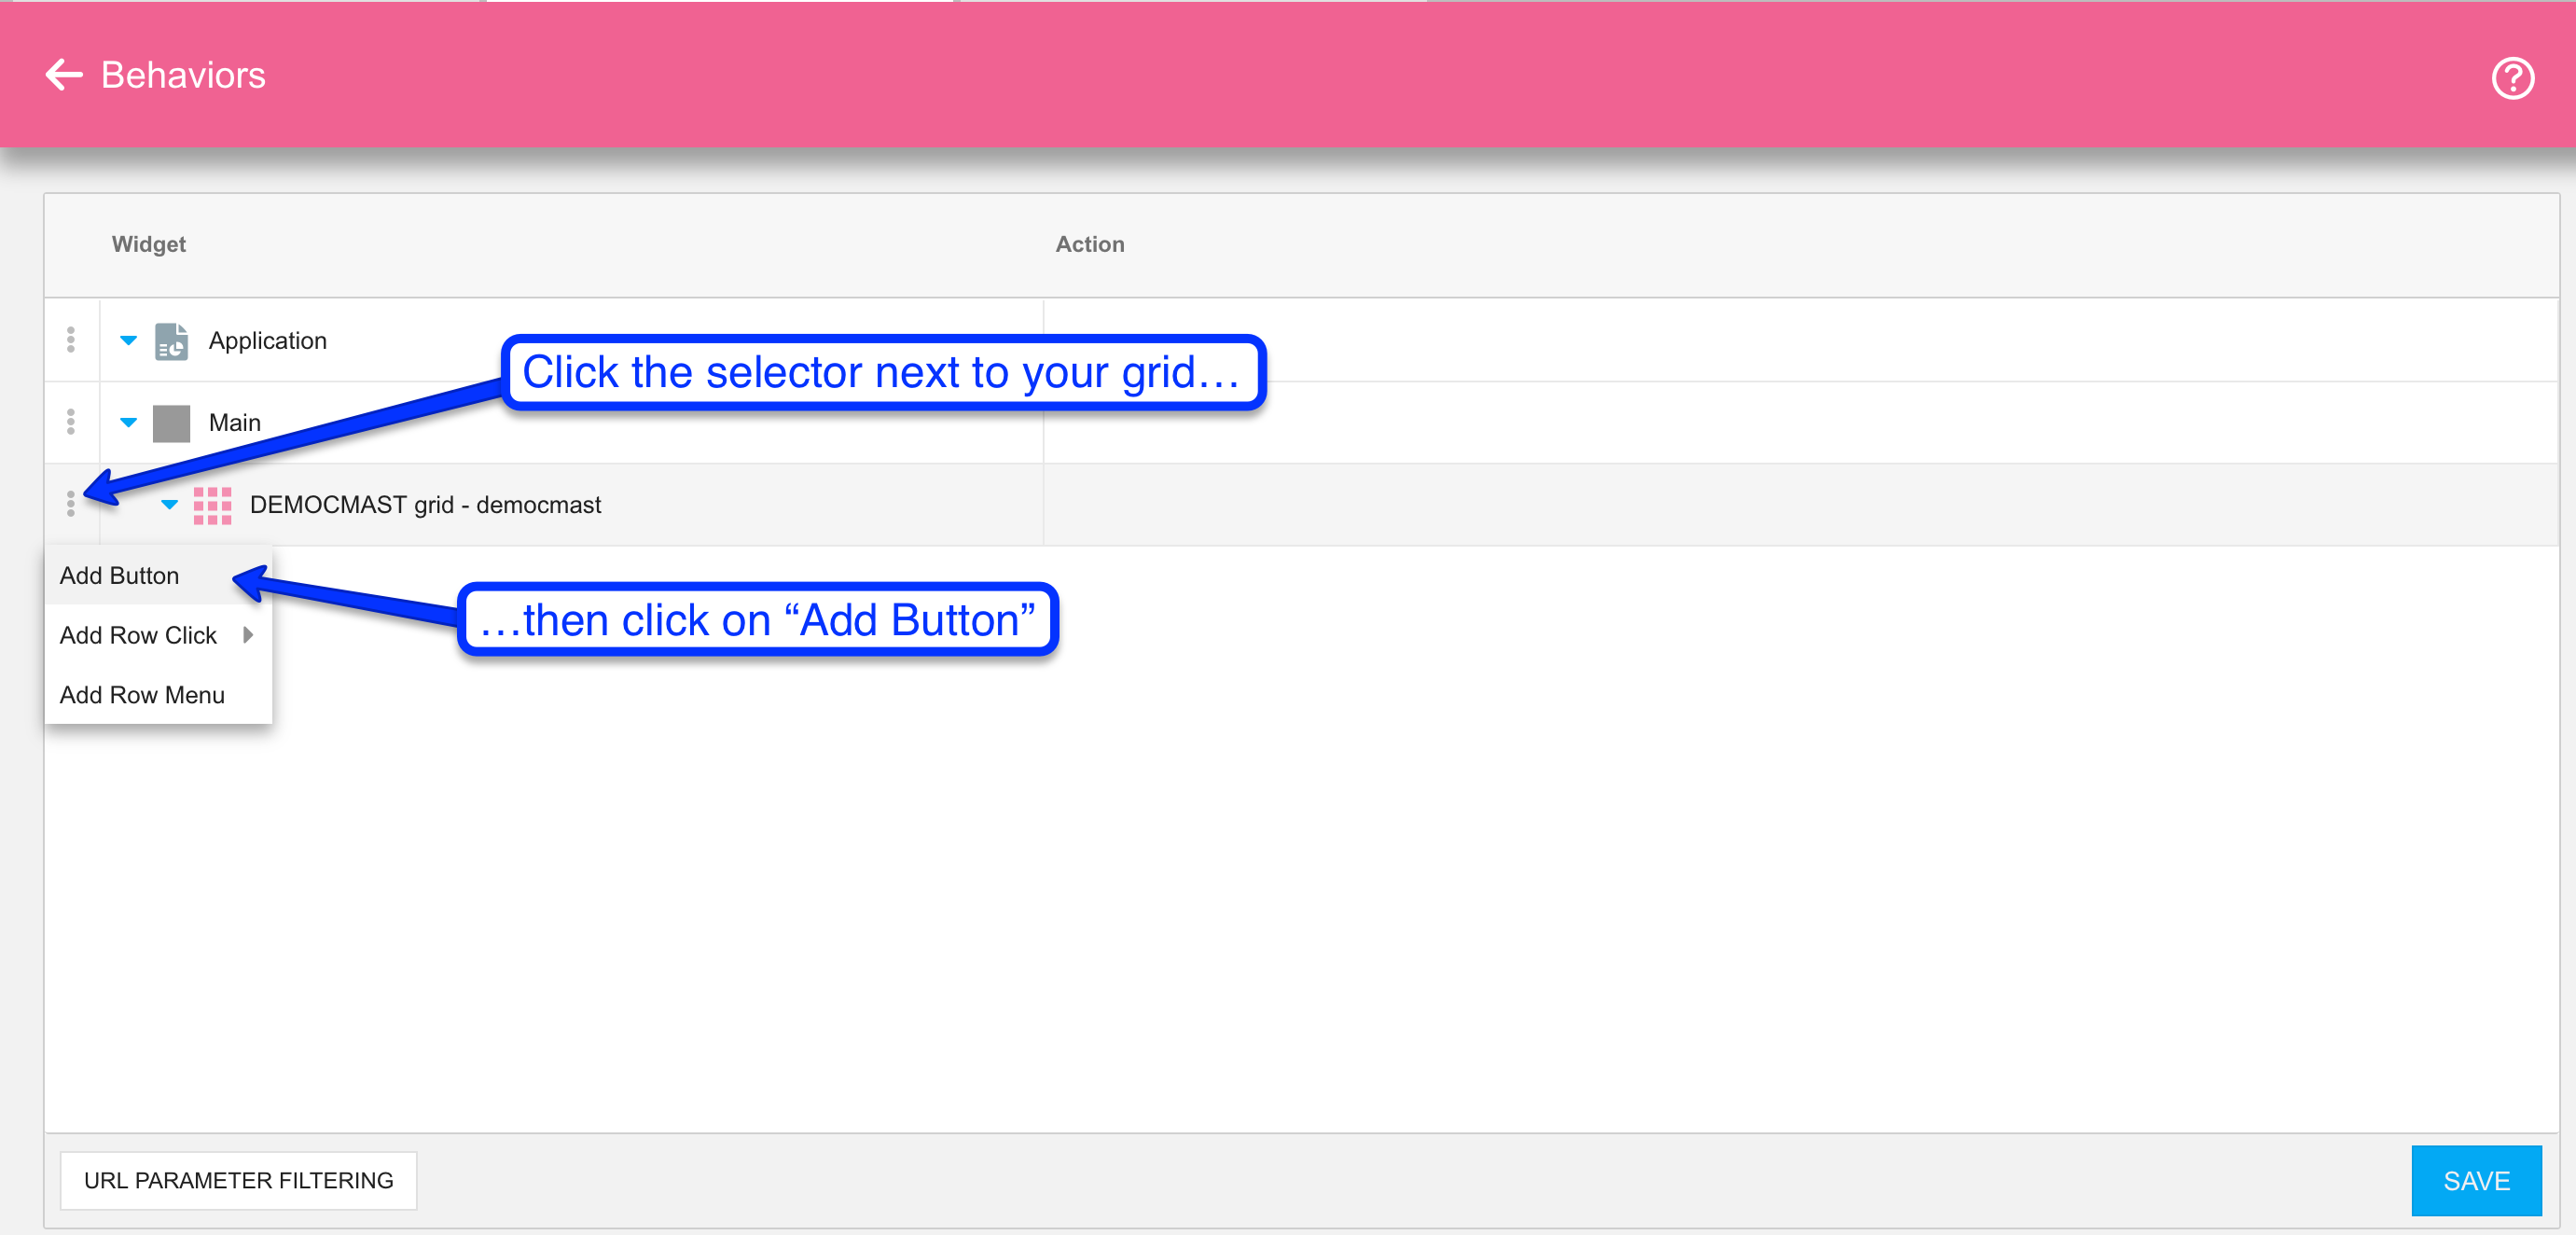
Now we’re ready to add a button to the top of the app to process whatever rows the users select. Click on the Behaviors button, then add a button to your grid widget, as depicted here:
You will then be prompted for the button configuration. Here you will want to enter the text to show on the button, indicate that the button should show only after the user has selected one or more rows, and specify the program name to be called. You could also add an action here if your called RPG program has more than one purpose – so the program could pull in the value via vvIn_char(‘action’) – but if there’s only one purpose for the program (as is the case here) you can leave it blank.

Before saving these values, you should click on “PROGRAM CALL SETUP” to add some pre-call functionality to the app. For example, you could add the customary “Are you sure you want to proceed” confirmation text, giving the user a chance to change their mind and cancel out of the function. But in the case of our example app here, let’s say we want the user to enter a reason for why the selected customers are being placed on credit hold. To do that we’ll set up a text field where they can enter that reason value:
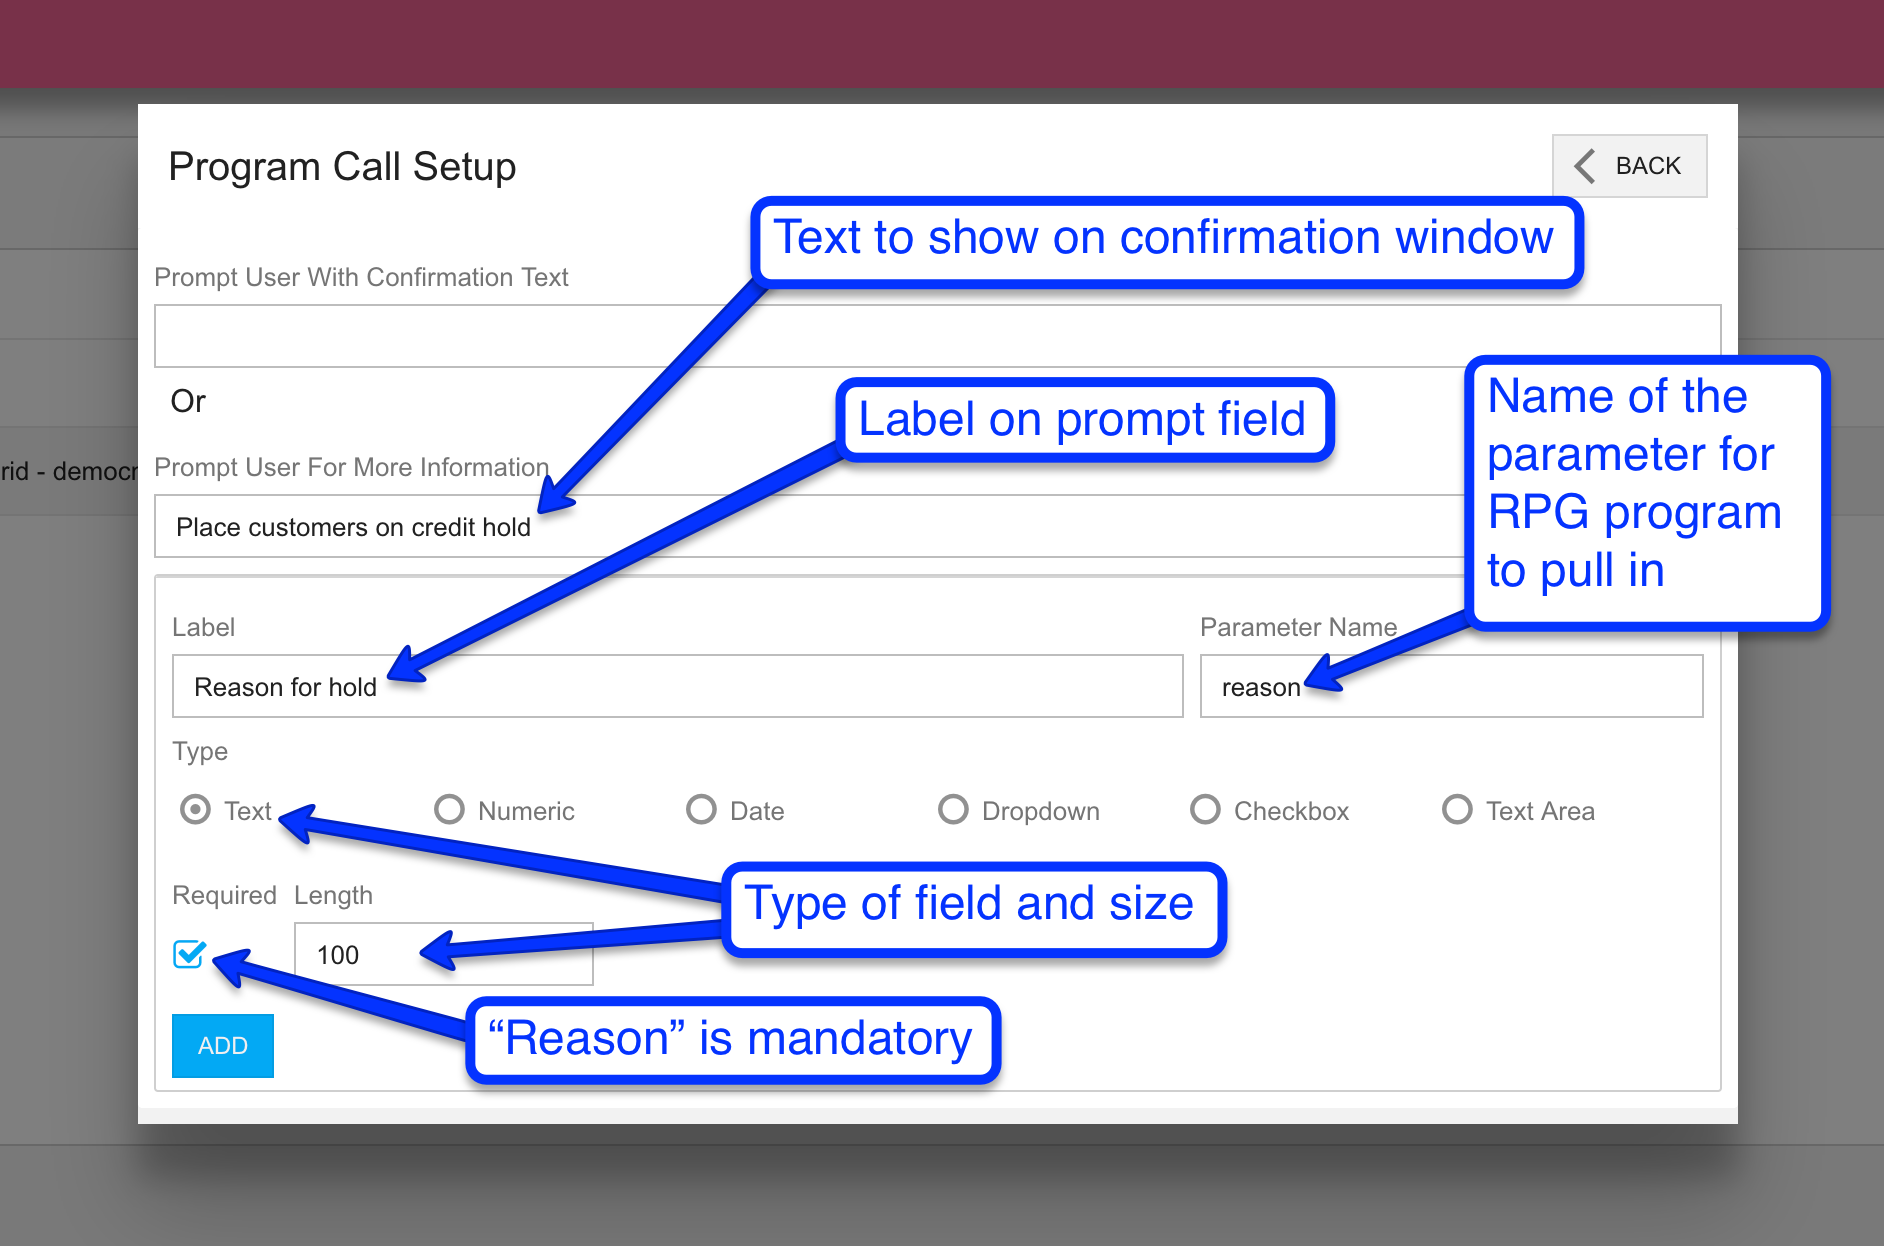
Note that you can add multiple prompt fields here (just enter the appropriate values and click ADD for each one), and the prompt fields aren’t limited to free-form entry. You have the option of creating a prompt field that links to another data source using the “Dropdown” setting, so that your users would select an appropriate value from a combo box rather than having to type in a value. Once you’re done setting up the program call configuration and you’ve hit the ADD button, click on the BACK button and then SAVE. Click the subsequent SAVE button to save your Behaviors, then Save the app. The app is now ready to launch and, in the case of our example here, should look something like this:

It should be noted that row selections must be made within a single page of the grid, as advancing to the next page without first clicking on the action button will cause the row selections to be lost. So for purposes of this kind of app, it may be best to either set up your grid widget as non-paging, or to configure it to have many rows per page (more than the default of 25).
Step 3: Set up your back-end RPG program
The final step in this process is to set up the RPG program to receive the call from your front-end app. When the user clicks on the action button, all the rows they’ve selected will be passed into this program as an array. The program can then handle whatever business logic needs to be done, typically by calling another program you’ve already set up for this purpose. We’ll start this step by making a copy of the example RPG source code for EXQRYBTN (or EXNABBTN for Valence 5.2 and beyond), which you can find in the QRPGLESRC source file in your Valence library:
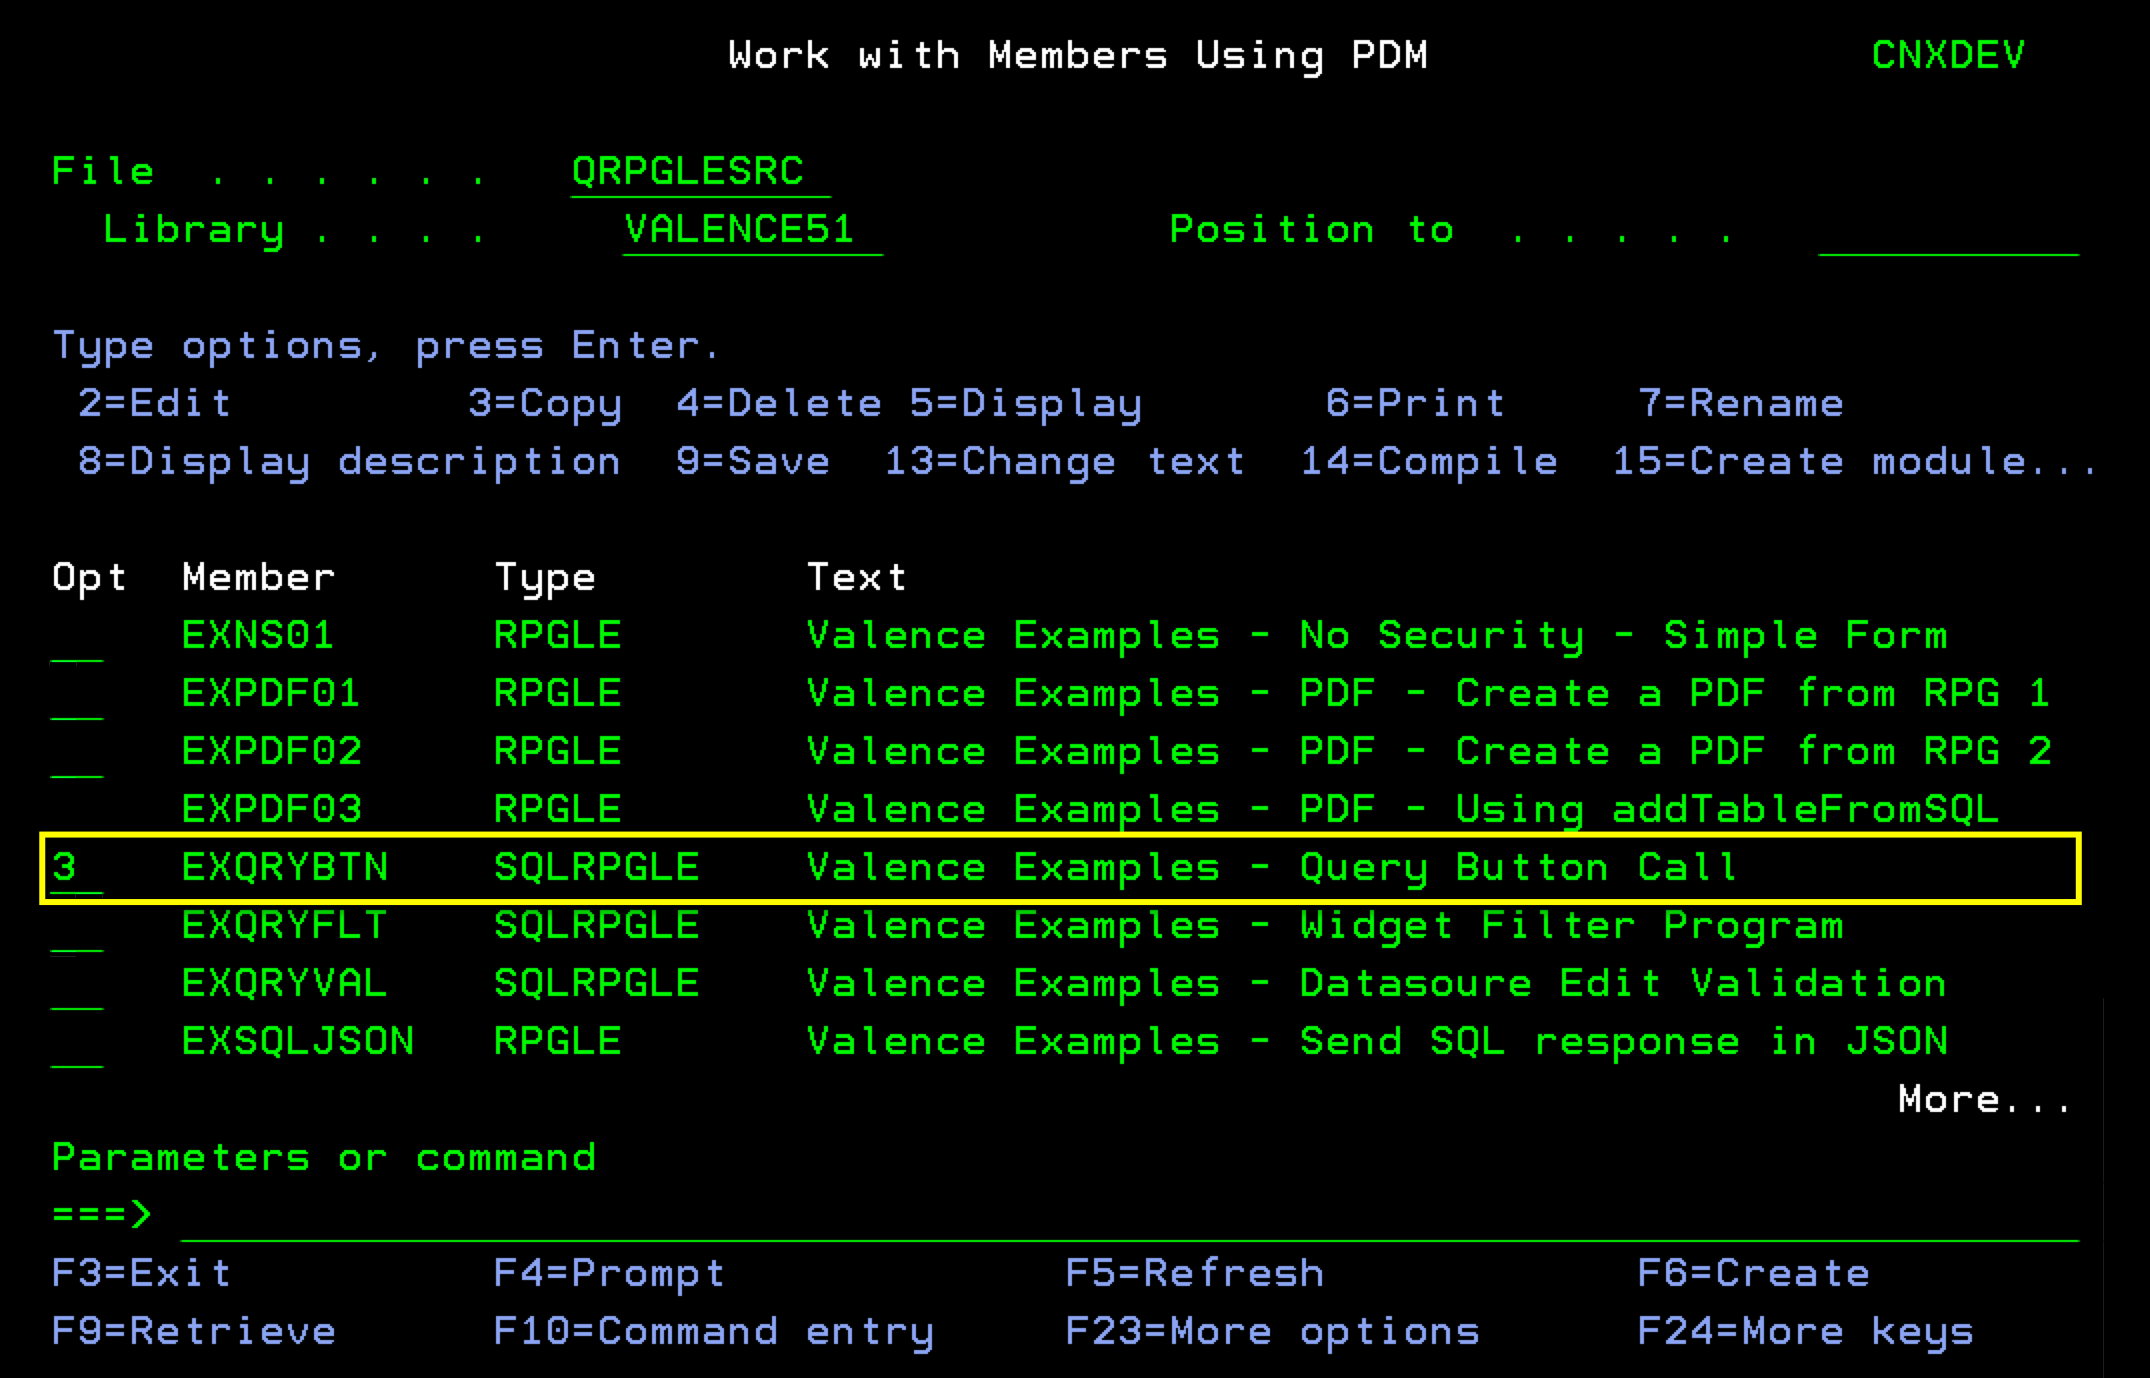
Copy this source to your development library and give it a name of your choice, matching whatever you specified for the RPG program name in Step 2 (CH0001 in the case of our example in figure 5). Be sure to also change the “exqrybtn” PI and PR to match the name. Then you’ll want to replace the “Process” procedure with your own custom code that pulls in the selected rows and acts accordingly. Using our DEMOCMAST example, where we’re passing the selected CUSNO values to the RPG program, we’d want to set up our Process source code as follows:
** --------------------------------------------------------------
p Process         b
d                 pi

d lCusno          s              6s 0
d lReason         s            100a    varying

d CH0002          pr                   extpgm('CH0002')
d   cusno                        6s 0  const
d   reason                     100a    varying
 /free

  // Pull in the reason text from confirmation window
  lReason=vvIn_char('reason');

  // Loop through all selected customers and call our "Customer Hold" routine, CH0002
  for gIndex = 1 to gSelectionCnt;
    lCusno = GetSelectionNum(gIndex:'CUSNO');
    CH0002(lCusno:lReason);
  endfor;

  // Send a response back to the app, reloading the grid
  vvOut_toJsonPair('success:true,'+
                   'refresh:true,'+
                   'msg:Placed ' +%char(gSelectionCnt)
                                 +' customers on credit hold');

 /end-free
Figure 9: RPG source code to loop through selected records and call a processing program
The procedure works in this example by first pulling in the reason value that the user entered, followed by looping through the selections. For each selected customer, it passes the customer number and reason into our company’s Credit Hold program (CH0002), which handles the business logic associated with that process. When you’ve completed your source code adjustments, the final step is to compile the program with the appropriate Valence library in your library list. Be sure to compile the program with RPGPPOPT(*LVL2) so it can properly process the required SQL-embedded copy source.